
A drawing tells you what a character looks like. A five-second shot can tell you how heavy it is, what kind of world it belongs to, and whether you want to see the next scene.
This is Unit 07: a mech developed in Voyager from a drawing through character sheets, material studies and a cinematic landing. The useful trick is to approve the design before asking it to move. Each stage gives the next one something concrete to preserve.
You can use this approach for a game pitch, a character reveal or a short-film concept. Start with a drawing you own, an image tool that accepts references, and an image-to-video tool. The prompts below are reusable adaptations of the workflow shown in the creator's breakdown.
Build a character sheet before a scene
A dramatic angle can hide a weak design. A plain character sheet puts the proportions, joints and silhouette where you can inspect them.
Attach your drawing and ask:
Create a clean character reference sheet from this drawing.
Preserve the head shape, shoulder proportions, torso, hands
and feet. Show front, side and back views at matching scale,
with aligned head and ground heights on a white background.

Simplify distracting sketch lines without redesigning the
character. Keep the pose neutral and the silhouette readable.
For this mech, add separate top and bottom views.
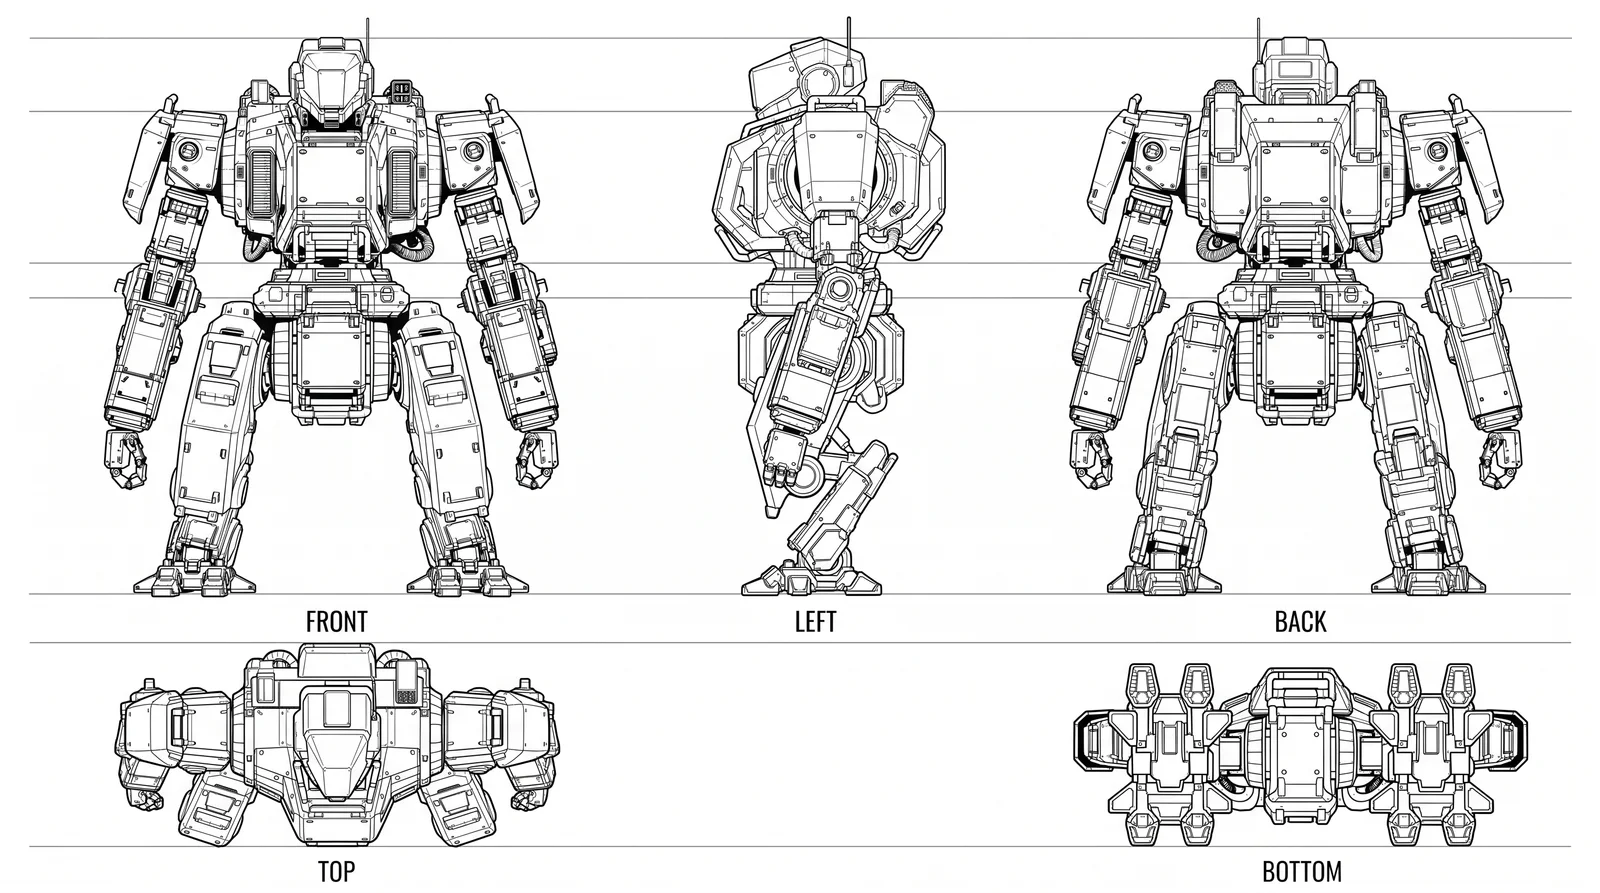
Check the views against each other. Do the shoulder blocks have the same shape? Does the side view leave room for the torso and backpack? Generated turnarounds can disagree; correct visible contradictions before using the sheet as a reference. It is a design guide, not a mechanically validated 3D model.
Give the materials a history
Unit 07's olive armor, pale panels and stenciled numbers make it recognizable beyond the line drawing. Dirt and chipped edges suggest a working machine rather than a showroom render.
Use the approved sheet as the next reference:
Add a material pass to this approved mech sheet. Use olive
painted armor, warm off-white secondary panels, dark exposed
joints and subtle metal wear. Preserve every view's proportions.

Then make a weathered version: add the unit number 07 to the
chest and shoulders, small warning decals, chipped paint at
exposed edges, dirt around the feet and scratches where parts
would make contact. Keep the large color areas easy to read.
Compare the clean and weathered versions. If the wear obscures the silhouette or makes every panel equally busy, reduce it. Pick a few identity cues to carry forward: the helmet, shoulder blocks, palette and chest marking matter more than matching every scratch.
Make one frame that earns the animation
Now give the character a situation. In this example, a burning industrial yard creates warm backlight against a cool, smoky sky; the low camera makes the mech feel imposing.
Attach the approved material sheet:
Place this exact mech in a cinematic action still: a low camera
in a rain-soaked industrial yard, fire behind the character,
cool smoke above, wet ground and scattered debris.

Preserve the olive and cream armor, helmet, shoulder shapes
and 07 markings. Give the character believable weight and
clearly separated limbs. Keep the feet and ground contact
visible. Make the image feel like a live-action film frame,
with convincing metal, scale and lighting.
The creator's breakdown includes a particularly useful correction: clearing mud away from the planted leg so the foot reads. That is a better revision brief than “make it more cinematic.” It identifies the part preventing the action from making sense.
Try a similarly focused repair:
Keep the composition, character and lighting. Clear the mud
covering the planted shin and foot so the full shape is readable.
Preserve ground contact and the splash around it. Do not change
the pose or redesign the armor.
Animate one physical beat
Use the approved action still as the image-to-video reference. Keep the first shot short enough to judge one action: descent, impact and settling.
Make a five-second cinematic landing shot from this reference.
The mech drops into the yard, lands with heavy weight, then
settles as dust and loose debris spread across the ground.

Keep the camera low with a restrained impact response. Preserve
the helmet, armor colors, shoulder blocks and unit markings.
Keep the legs solid and the feet connected to the ground after
impact. End with a short hold so the landing registers.
Review the approach to the ground, the impact itself and the final pose. Look for a foot sliding after contact, changing limb shapes or markings turning into different symbols. If the action breaks, simplify the camera move or the body motion before adding more spectacle.
The clip keeps the mech recognizable, but its orange visor changes shape during the landing. That may work for a concept pitch; fix it before carrying the character into a sequence where the face needs to match.
This gives you a concept clip. If you need precise joint motion or an editable character rig, use a Blender animation workflow instead.
Turn the project into its own making-of film
The creator also used Voyager with the project's chat logs to make this process animatic. It shows the brief, the chosen variants, the leg correction and the finished shot in sequence.
This is a useful second deliverable for a portfolio, a client presentation or a social post. The project already contains the ingredients: the images, the chosen takes and the conversation explaining what changed. Ask Voyager to organize those into a film while that context is still at hand:
Use this project's images, selected clip and conversation to
make a short visual breakdown of the character's development.

Show the original drawing, approved sheet, materials, weathering,
action still, the planted-leg correction and the final video.
Pair each stage with a short caption explaining the decision.
Use only actual project assets and changes recorded here.

Make the images large enough to read. Hold comparisons long
enough to understand them. End on the finished landing, and
exclude private messages, local paths and account details.
The result gives someone more than a striking robot to look at. They can see which choices made it work, and borrow the process for a character of their own.
Make your next project in Voyager
Create an account, download Voyager, and start making.